Friday, 15 November 2013

Dynamic Compilation (Part 4)

I already explained how to quickly generate code from functions in previous posts.

Code generation has some interesting advantages:
  • You can export code to a project/file
  • This allows you to easily debug
Now this also has some drawbacks:
  • You need a good template engine, or create your own.
  • You can start to have a lot of different templates
  • String generation is feeling a bit clunky at times.
  • You are not allowed to dump your assembly, and in most cases you'll also have to create one temporary assembly per node (not always true).

In the other hand, it's also possible to generate IL code directly, or have it generated via Expression.

Expression is awesome, you can really do cool things with it, but in my use case it's not ideal (I need to reflect existing functions).I'll go back to expressions another time, since now we'll look at IL generation.

Instead of doing all this string cooking, we can just build our class at runtime emitting IL code (which is some kind of "high level assembler" to simplify.

This has the advantage that it's faster to build, you can create several nodes in the same assembly any time during your application lifecycle, dump/replace a method on the fly, and you learn a bit into the depths of .net ;)

So first you need to prepare a few builders:

Code Snippet
  1. AssemblyName myAssembly = new AssemblyName(Guid.NewGuid().ToString());
  2. AssemblyBuilder asm = AppDomain.CurrentDomain.DefineDynamicAssembly(myAssembly, AssemblyBuilderAccess.Run);
  3.  
  4. ModuleBuilder mb = asm.DefineDynamicModule("MyModule");
  5.  
  6. TypeBuilder tb = mb.DefineType("Hello");
  7. tb.AddInterfaceImplementation(typeof(IAutomatonNodeInstance));

Then you need a default constructor, it doesn't create one for you:

Code Snippet
  1. ConstructorBuilder cb = tb.DefineDefaultConstructor(MethodAttributes.Public);

That was hard :)

Now you need to also create fields to accept your method delegate:

Code Snippet
  1. ParameterInfo[] prms = method.GetParameters();
  2. List<FieldBuilder> fields = new List<FieldBuilder>();
  3.  
  4. FieldBuilder containerfield = tb.DefineField("container", typeof(IAutomatonNodeContainer), FieldAttributes.Private);
  5. FieldBuilder routput = tb.GetSourcePin(method.ReturnParameter.ParameterType, "output");
  6.  
  7. foreach (ParameterInfo pi in prms)
  8. {
  9.     fields.Add(tb.DefineField(pi.Name, this.GetSinkType(pi.ParameterType), FieldAttributes.Private));
  10. }

Basically I create one field to accept the Node container, one field for the ouput.
Then you iterate on Parameter list and create one field for each of those (oh and you can just specify type, no crazy using namespaces or adding them all around).

Now let's go to the interesting bit, my node has 2 methods : Initialize (container), Evaluate (no parameters)

Initialize does the following:
  • Assign container
  • Create pins/parameters.
Evaluate does:
  • Read parameters
  • Call function
  • Assign output
So to initialize, we do the following:

Code Snippet
  1. MethodBuilder assign = tb.DefineMethod("AssignContainer", MethodAttributes.Public | MethodAttributes.Virtual, CallingConventions.HasThis, typeof(void), new Type[] { typeof(IAutomatonNodeContainer) });
  2. ILGenerator assignopcodes = assign.GetILGenerator();
  3.  
  4. assignopcodes.Emit(OpCodes.Ldarg_0);
  5. assignopcodes.Emit(OpCodes.Ldarg_1);
  6. assignopcodes.Emit(OpCodes.Stfld, containerfield);
  7.  
  8. int i = 0;
  9. foreach (ParameterInfo pi in prms)
  10. {
  11.     assignopcodes.CreateParameter(pi, fields[i]);
  12.     i++;
  13. }
  14.  
  15. assignopcodes.Emit(OpCodes.Ldarg_0);
  16. assignopcodes.Emit(OpCodes.Ldarg_1);
  17. assignopcodes.Emit(OpCodes.Callvirt, typeof(AutomatonNodeContainer).GetProperty("PinFactory").GetGetMethod(true));
  18. assignopcodes.Emit(OpCodes.Ldstr, "Output");
  19. assignopcodes.Emit(OpCodes.Callvirt, method.ReturnParameter.ParameterType.CreateSourcePinMethod());
  20. assignopcodes.Emit(OpCodes.Stfld, routput);
  21. assignopcodes.Emit(OpCodes.Ret);

We create a method (make it public and virtual since we implement an interface).
CallingConvetion.HasThis is necessary since it's a class method (basically this will be pushed as first argument, eg: OpCodes.Ldarg_0)

Then we create parameter like this:

Code Snippet
  1. public static void CreateParameter(this ILGenerator gen, ParameterInfo pi, FieldBuilder field)
  2. {
  3.     gen.Emit(OpCodes.Ldarg_0);
  4.     gen.Emit(OpCodes.Ldarg_1);
  5.     gen.Emit(OpCodes.Ldstr,pi.Name);
  6.     gen.Emit(OpCodes.Callvirt, pi.ParameterType.CreateParameterMethod());
  7.     gen.Emit(OpCodes.Stfld, field);
  8. }

We push this + container.
Push parameter name on the stack.
Emit a callvirt on the method info.
Stfld will store the result into our private field.

Testing in debug, and here we go, all our parameters are properly injected, I can see my node fully initialized.

Of course for now it does nothing. So second part: evaluate:

This is mostly as easy.

  • Push all the parameters necessary to call the static method (here i need to be careful of Getters/Setters).
  • Call the static method.
  • Push the return value in the output field.
Here we are :

Code Snippet
  1. MethodBuilder eval = tb.DefineMethod("Evaluate", MethodAttributes.Public | MethodAttributes.Virtual, CallingConventions.HasThis, null, new Type[] { });
  2. ILGenerator evalopcodes = eval.GetILGenerator();
  3. evalopcodes.Emit(OpCodes.Nop);
  4. evalopcodes.Emit(OpCodes.Ldarg_0);
  5. evalopcodes.Emit(OpCodes.Ldfld, routput);
  6.  
  7. i = 0;
  8. foreach (ParameterInfo pi in prms)
  9. {
  10.     evalopcodes.Emit(OpCodes.Ldarg_0);
  11.     evalopcodes.Emit(OpCodes.Ldfld, fields[i]);
  12.     evalopcodes.Emit(OpCodes.Callvirt, pi.ParameterType.ParemeterGetterMethod());
  13.     i++;
  14. }
  15.  
  16. evalopcodes.Emit(OpCodes.Call, method);
  17. evalopcodes.Emit(OpCodes.Callvirt, method.ReturnParameter.ParameterType.SourcePinSetterMethod());
  18. evalopcodes.Emit(OpCodes.Nop);
  19. evalopcodes.Emit(OpCodes.Ret);
  20.  
  21. Type t = tb.CreateType();

First we push our return field first (since it needs to receive the value).

Then we push on the stack all fields (for loop).
Call the function.
Push the output result (on top of the stack) in our output pin.

Et voila.

As you can notice, code is decently verbose, but it's not too bad, and a lot of the code can be reused to build different type of nodes.

Please of course note that I can also just export this assembly as a file.

That's it for now, probably more to come !


Wednesday, 6 November 2013

Dynamic Compilation (Part 3)

Here we are... Again!

So in previous post I explained about reflecting functions, now one common thing I have is some form of post processors.

For most of them, they are pretty straightforward, a few render pass and bit of rebinding. Having a generic host is nice, but sometimes I need more sandboxing (so you can have a bit better internal optimization).

So if we take this basic shader (Yes my copyashtml is broken again ;)


Simple, just displace a texture from some FFT data, nothing fancy.

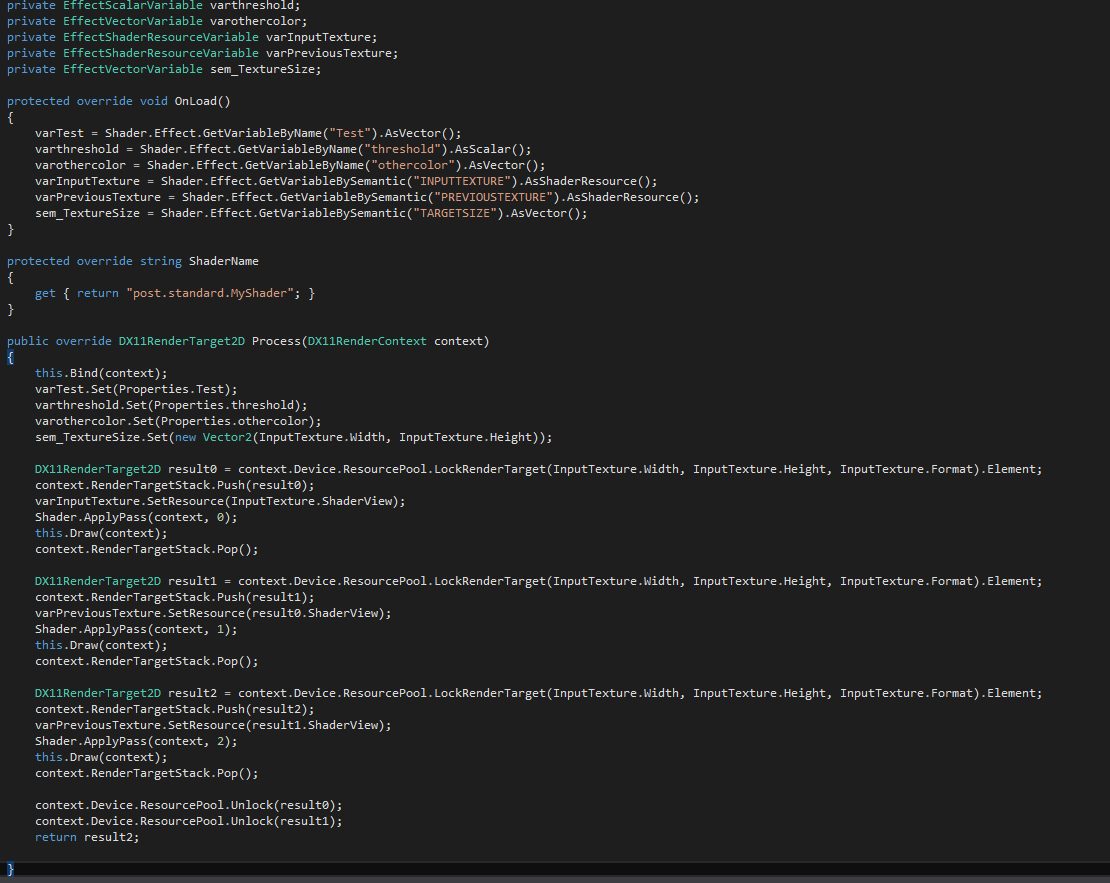
Now here is the c# code to glue this, here is the property class.


And here is the glue:


Nothing fancy, but when you have to bind this code for every shader you write, it quickly becomes cumbersome.

Please also note that this new post processing format it independent from both my tool and vvvv (technically I use another small code generator to build nodes from those class in my tool, I could do it as easily in vvvv but since my API is built in .NET 4.5 and vvvv prefers to support WindowsXP instead, it's not gonna happen right now ;)

As you can notice, this is again a lot of boilerplate code, that can easily be generated.

So instead, I have a small exe, you send the fx file to it, and it builds pretty much the same code from reflection (and give me the compiled shader on the way, so i can store it to speed up load time).

Here is a shader example (does nothing of any use):


And here is generated code


So basically I generate code from a shader file, then this code generates node code, uff ;)

If you are wondering, I'm not all in full for generating everything, there's a lot of cases where you don't want to.

Funnily, generating code can also make debugging easier, compared to a generic host, since most of your case handling has already be pre processed, you only end up with the very core logic (no crazy for loops/crazy dictionaries, if/then else to check a condition...), so You have a reasonable performance boost, which is not as big as if you do that "dream case cbuffer god of all", but we like dynamic languages no?

And for vvvv readers don't forget to bitch about .NET 4.5, so SharpDX in vvvv gets some more progress ;)

http://vvvv.org/forum/.net-4.5-framework-support


Tuesday, 5 November 2013

Dynamic Compilation (Part 2)

Finally I have a full windows 8.1 installed on all my machines, so I'm pretty excited to be able to now concentrate fully on dx11.2 development. That also means that I have my CopyToHtml tool working again (it got fucked up somehow in my previous studio).

I spoke about how I was reflecting hlsl functions using latest DirectX features in previous post.

Now one interesting thing, is my automaton has (a lot) of boilerplate. Building a node is fairly easy, but generally quite tedious.

Here is an example (that builds a color from hsl parameters):

Code Snippet
  1. using System.Text;
  2. using SharpDX;
  3.  
  4. using FlareTic.Graph.Interface;
  5. using FlareTic.Graph.Interface.Automaton;
  6.  
  7. namespace FlareTic.Nodes.Automaton
  8. {
  9.     [AutomatonNode(Name = "HSL", Category = "Color", SystemName = "flt.automaton.Color.HSL")]
  10.     public class ColorHSLNode : IAutomatonNodeInstance
  11.     {
  12.         private ScalarSinkPin h;
  13.         private ScalarSinkPin s;
  14.         private ScalarSinkPin l;
  15.         private ScalarSinkPin a;
  16.  
  17.         private ColorSourcePin output;
  18.  
  19.         public void AssignContainer(IAutomatonNodeContainer container)
  20.         {
  21.             this.h = container.PinFactory.CreateScalarSinkPin("Hue");
  22.             this.s = container.PinFactory.CreateScalarSinkPin("Saturation");
  23.             this.l = container.PinFactory.CreateScalarSinkPin("Brightness");
  24.             this.a = container.PinFactory.CreateScalarSinkPin("Alpha");
  25.  
  26.             this.output = container.PinFactory.CreateColorSourcePin("Output");
  27.         }
  28.  
  29.         public void Evaluate()
  30.         {
  31.             this.output.Value = FlareTic.Core.Maths.ColorSpaces.FromHSL(h.Value, s.Value, l.Value, a.Value);
  32.         }
  33.  
  34.         public void Dispose() { }
  35.  
  36.     }
  37. }

Finally from what we see here, we have a static function, a few parameters and some attributes.

For each node we need to endlessly repeat all that build code, all this just to build a function...
But, thinking about it (and I remember 4v people trying to do something like that at some point), I can easily reflect a function too.
And c# allows to compile an assembly on the fly.
So wouldn't it be better to just reflect the function, generate code on the fly and compile into an assembly?

It would look somehow like this:

Code Snippet
  1. [FunctionBank()]
  2. public static class Arithmetic
  3. {
  4.     [Function(Name = "Add",Category="Value", OutputName="Output")]
  5.     public static float Add([Parameter(Name = "Input 1")] float v1, [Parameter(Name = "Input 2")] float v2)
  6.     {
  7.         return v1 + v2;
  8.     }
  9.  
  10.     [Function(Name = "Substract", Category = "Value", OutputName = "Output")]
  11.     public static float Substract([Parameter(Name = "Input 1")] float v1, [Parameter(Name = "Input 2")] float v2)
  12.     {
  13.         return v1 - v2;
  14.     }
  15.  
  16.     [Function(Name = "Multiply", Category = "Value", OutputName = "Output")]
  17.     public static float Multiply([Parameter(Name = "Input 1")] float v1, [Parameter(Name = "Input 2")] float v2)
  18.     {
  19.         return v1 * v2;
  20.     }
  21.  
  22.  
  23.     [Function(Name = "Equals", Category = "Value", OutputName = "Output")]
  24.     public static bool Equals([Parameter(Name = "Input 1")] float v1, [Parameter(Name = "Input 2")] float v2, [Parameter(Name = "Espilon")] float eps)
  25.     {
  26.         return Math.Abs(v1 - v2) <= eps;
  27.     }
  28. }

Now from this, we can indicate that our class has functions (to speed up processing and not scan every method of every class).

Every export function has a little description, same for parameters.

Try number 1, build a little code builder, small template node, and inject code depending on parameters.

Simple and easy, works.

Now as you see you have a lot of attributes, and I find them a bit intrusive. The main problem is also that sometimes I might just want to use a function in a compiled dll.

So instead of reflecting the function directly, you can simply create a delegate, this looks like this:

Code Snippet
  1. [NodeDelegateAttribute(Name = "Add", Category = "Value", OutputName = "Output", FunctionName = "CodeLib.Arithmetic.Add")]
  2.     public delegate float AddDelegate([Parameter(Name = "Input 1")] float v1, [Parameter(Name = "Input 2")] float v2);

Now the nice thing is I can rename the function, give proper naming to parameters...

So from those 2 lines of code I now have a nice nodes.

Please note that this is also cumbersome, when you have an API like SharpDX you have thousands of functions.

So instead, we can also do the following:

  • Scan the datatypes I want to import.
  • Reflect functions.
  • Do a pre-test to check that I want/can import this function.
  • Use function reflection directly to build my code.
This is really simple and works really well, the only little issue is that I can't really name parameters the way I want (unless I start to build some ruleset, but it might be painful).
In case of standard Math types, it's really not important at all tho ;)

So here we go, on startup I specify what types I want to scan, it builds a function list, selecting a function simply generate node code on the fly, compiles it and create a node.

How to have 5000 nodes in few lines of code, one weekend well spent ;)


Of course, another great thing is that it also helps a lot for exporting an exe at the end, since you can just compile all functions used in a single assembly (as nodes), or export the generated code in a c# project, you can easily cherry pick which function get used and avoid to deploy all nodes.

Here we are, most of my tool is now heading towards that, simpler, cleaner, all that I love ;)

Stay tuned for next section, which is going into something a bit more complex ;)

Monday, 4 November 2013

Dynamic Compilation (Part 1)

I already spoke about the fact that I wasn't that keen on Visual graph editor for shaders.

Well I started (thanks to DirectX11.2) to partly change my mind.

In DirectX11.2 they introduced this compiler feature called Function Linking Graph, which basically allows you to link HLSL functions together.

One thing that I quite liked in that in some extent is that the linker is fast (very fast). Another very cool aspect is that you can reflect a function (including parameters). This is really nice, I can have a list of common useful functions (noise/waves...), but also create a function on the fly and have full reflection access.

Having the possibility to get an hybrid approach is a huge step in the right direction, patch only is a bit too monolithic, you end up quickly limited or have to build some pretty heavy patches.

So here is a screenshot of shader patch (builds a pixelshader), It really took very little time to build it:


I have a folder with common functions, which get reflected on load and build node on the fly, but I can as well add my own custom functions on the fly with code editor, that's quite fun ;)

Now there's always a but with these things ;)

First, it only works with Vertex/PixelShaders.

So it's pretty cool to make some nice materials, post processors. I can even make some of my voxel processing with it (trading Compute Shader to few draw calls with GS).

Now one problem besides that, I would love to actually just have the function, and bind it in whatever context I want, this is what I do with subshaders (which are some kind of includes). I have an incomplete shader (that I call host), and bind only the include code. If I simply could include the graph that would be perfect :)

Well it's not possible with linker, but the graph has this quite useful function called : GenerateHLSL :)

So you can get the generated code from it, here is how it looks for the screenshot above:


You have forward function declarations (eg: you still need to add includes yourself), and you have your pixel shader function as inout.

But wait...

Finally let's say I want this prototype:
float GetForce(float3 position);

I can simply tell the pixel shader that i return a float since when you generate hlsl , unlike when you link, you don't care much about context.

So I just need to add a function (to fit the out), or modify my host (with conditional compilation), to change prototype to:
GetForce(float3 position, out float force);

And there we go :)


Of course in that case I just have generated code (eg: no link), so I still have to compile the whole shader, but still, having some graphical tool to build functions opens some new possibilities (sphere tracer, behaviours, colliders)...

Next part will go into something similar but different ;)

Tuesday, 22 October 2013

Transformation Matrices tricks

Anyone doing any type of coding has encountered transformations. They are the building block of any 3d application/game engine...

Now most of the time people will also not write their matrix code, it's already provided by any library, which ideally will provide you nice SIMD version for operations.

I assume you already know what is a Transform and what is a multiply.

So now a few operators of interest (eg: that you want to avoid to use), are Multiply (you will need it a lot but you want to save as many as you can) , and Invert (since it involves precision issue).

Generally you'll have spent a lot of time finding a reasonably fast Matrix multiply algorithm (which is SSE optimized), but then you can also simply spend time to just check how Matrix operator works and avoid using it :)

So let's take a few examples:

1/Translate and Scale

So let's say you want to move an object, then scale it.

You can create a Translation Matrix, create a Scaling Matrix, and multiply both of them.


 Now you can see there's not much point doing that, you can just set the Row for the translation and set the diagonal for the scaling. You saved one multiply just by doing this.

2/Scale then Translate

Now you obviously know that order or operation is important when dealing with operators, So if you scale before translate then you need a multiply.


So here we scale by S, then translate by T

We can do the same as before, eg:
Create Scaling Matrix , Create Translation Matrix and multiply them. Again lot of operators wasted.

You can simply set diagonal to S, and set last row (Translation) to S*T.
You just multiplied two vectors component wise instead of a full matrix multiplication.

Now, if you need to translate a Matrix but you don't know what the previous Matrix contains, you would say that you need to multiply. Yes and No ....

Translating a matrix will ONLY affect the last row, so instead of having the code :
Multiply Source * Translation Matrix, you can simply have a method that applies the matrix multiplication on the last row only (eg: you do 1/4th of the operation). First three rows will not be changed, no point of processing them.

3/Rotation


Now you have a nice rotation matrix around, but at some point you need to invert it (to process some billboards for example).

If your rotation is "pure rotation" (eg: no scaling component), this has an interesting property:
A*At = I (eg: matrix * transposed matrix) = identity.

This means that instead of inverting your matrix, you can simply transpose it for the same result, saving some multiplies).

4/Scaling

Another common operation is to scale a matrix (as per the Translate then Scale example).

So in this case you want to scale your matrix by sx,sy,sz

You can (as usual), create a scaling matrix and multiply all your lot, or simply
Multiply row 1 by sx
Multiply row 2 by sy
Multiply row 3 by sz

Et voila, 12 multiplies and you're sorted. (This can also be very easily vectorized).

5/LookAt

Look at matrix is a bit of a special transform, of course widely used for cameras.

Simply put, from 3 components:
Eye : Eye Position
Target : Position where you look at (not direction)
Up Vector : This is often used for camera Roll. (in most cases it will be 0,1,0)

From those 3 vectors you construct a matrix that brings object into a space relative to the camera. 
There's no Scaling involved, so you mostly have a translation and a rotation.


Now most times you will compute your LookAt matrix and immediately Invert it (so you can use it for sprites, deferred rendering....)

Now let's think about the translation component.

I mentioned before that a LookAt transform brings your object into camera space, so to invert it, your translation component is ... your eye position :)

Now I also mentioned that there's a rotation component, which can be extracted into a 3x3 matrix , and you can simply transpose this matrix to have the invert rotation.

So technically you can build both LookAt and Invert in one go, saving again an Inversion.

Please note that for brevity I only bothered to show the transposed part in the Patch, but you get the concept.

That's it for now, but you have much more tricks like this when dealing with vectors.

As an exercise, for the reader build projection matrix and it's inverse in one go:

Ortho : http://msdn.microsoft.com/en-us/library/windows/desktop/bb205347(v=vs.85).aspx

Perspective : http://msdn.microsoft.com/en-us/library/bb205350(v=vs.85).aspx

Have fun !


Friday, 11 October 2013

Parallel Reduction basics

Very often in computer graphics we need some form of parallel reduction.

For example, I stumbled on a vvvv blog post about boids simulation. In that case there is two main things you need for efficient simulation:

  • Average of all positions.
  • Acceleration structure for neighbours
Since actually both techniques use similar concepts, but the second one is slightly more advanced, I'll explain the first one.

So here is the deal:
We have let's say 4096 (64*64) boids, and we need average for some rules.

Our boids are stored in a StructuredBuffer (so we can Read/Write into it).

If we do this in CPU, we have something like this (pseudo code)

float3 sum;
foreach(boid in boids)
{
    sum += boid.pos;
}
sum /= (float)boidscount;

Of course, problem is our data is in GPU, so we don't want to transfer back and forth.

What is actually fun in DirectX11 is you have many ways to cover the same technique, let go trough a few of them.

1/Additive Render

Create a 1x1 texture (R32G32B32A32_Float)

Render all your boids, vertex shader is like this:

Code Snippet
  1. struct vsInput
  2. {
  3.     uint iv : SV_VertexID;
  4. };
  5.  
  6. struct psInput
  7. {
  8.     float4 screenpos : SV_POSITION;
  9.     float4 objectpos : TEXCOORD0;
  10. };
  11.  
  12. psInput VS(vsInput input)
  13. {
  14.     psInput output;
  15.     output.screenpos = float4(0,0,0,1);
  16.     output.objectpos = float4(PositionBuffer[input.iv],0.0f);
  17.     return output;
  18. }

Here we just set position to be 0,0 (since anyway we have single pixel), Boid position is sent to pixel shader as Texture Coordinate.

No here is our (hardcore) pixel shader:

Code Snippet
  1. float4 PS(psInput input): SV_Target
  2. {
  3.     return input.objectpos;
  4. }

We only return object position (please make sure to set Blend to Additive).

Now our single pixel contains the sum of all positions.

Divide this by boids count (in another pixel shader or a single compute shader), and you have your average position.

2/Good old MipMap

For this one, this is also pretty simple. Create a texture in R32G32B32A32_Float format as well, big enough to fit all boids (in our case 64*64 fits perfectly).

Now render your boids as PointList (so each boids position must arrive in a single output pixel).

So either draw 4096 elements, position boids from SV_VertexID to match a pixel (basic 1D->2D conversion). 

Alternatively you can make an instanced Draw Call (like 64 instances of 64 vertices each), So you will have SV_VertexID and SV_InstanceID as vertex shader input (each one representing row/column index)

Write boid position in the pixel as above (no additive this time, just a plain write).

Now just call GenerateMips on your texture, and your average position is in last mipmap.

So now since we use DirectX11 and have access to compute shaders, we might as well use them.

So here we are, compute shader way.

3/Dummy Loop 

Easiest technique to compute average is a simple dummy loop. 
You send a 1,1,1 dispatch, and here is the compute shader code:

Code Snippet
  1. [numthreads(1,1,1)]
  2. void CS_Average(uint3 dtid : SV_DispatchThreadID)
  3. {
  4.     float3 sum = 0;
  5.     uint cnt, s;
  6.     PositionBuffer.GetDimensions(cnt,s);
  7.     for (uint i = 0; i < cnt; i++)
  8.     {
  9.         sum += PositionBuffer[i];
  10.     }
  11.     
  12.     RWAverageBuffer[0] = sum * invcnt;
  13.     
  14. }

This (excluding simplicity), is an example on how NOT to use compute shaders.

You use a single thread which does all the job, so you have plenty of threads doing nothing and one doing big job, which is more like a serial algorithm.

But this will be useful at a later stage. Doing the whole calculation like that is a NO GO tho.

4/Iterative

Now let's improve that a bit. we want to use [numthreads(64,1,1)]

We have 4096 elements (eg: 64*64).

So what we'll do is the following:
Create a buffer with 64 elements.

Each of our threads will work on a part of the sum.

Code Snippet
  1. StructuredBuffer<float3> PositionBuffer;
  2.  
  3. RWStructuredBuffer<float3> RWAverageBuffer : BACKBUFFER;
  4.  
  5. [numthreads(64,1,1)]
  6. void CS_Average(uint3 dtid : SV_DispatchThreadID)
  7. {
  8.     float3 sum = 0;
  9.     for (uint i = 0; i  < 64; i++)
  10.     {
  11.         uint idx = i * 64 + dtid.x;
  12.         sum += PositionBuffer[idx];
  13.     }
  14.     
  15.     RWAverageBuffer[dtid.x] = sum;
  16. }
  17.  
  18. [numthreads(64,1,1)]
  19. void CS_AverageTransposed(uint3 dtid : SV_DispatchThreadID)
  20. {
  21.     float3 sum = 0;
  22.     for (uint i = 0; i  < 64; i++)
  23.     {
  24.         uint idx = dtid.x * 64 + i;
  25.         sum += PositionBuffer[idx];
  26.     }
  27.     
  28.     RWAverageBuffer[dtid.x] = sum;
  29. }

So now we have a 64 elements buffer containing a part of that sum. But we made efficient use of your threads (please note that I show two read patterns , "row or column" based).

Now what we can simply do it run our dummy loop above, but it will only run on 64 elements.

So by decomposing like this and adding an extra dispatch, we allowed the first part to run MUCH faster, and leaving a very little job to do for our unefficient shader, which gives a (very) significant gain.

Let's see another way

5/Using groupshared and Thread Sync

Now let's look if we can do this in Compute and a Single pass. Since our element count is not that high it should quite easily allow it.

We've seen that we store temporary sum into a structured buffer. Now compute shader have a small memory space where they can share data (it's big enough to fit our 64 elements).

So here are declarations:

Code Snippet
  1. float invcnt;
  2. StructuredBuffer<float3> PositionBuffer;
  3.  
  4.  
  5. RWStructuredBuffer<float3> RWAverageBuffer : BACKBUFFER;
  6.  
  7. //Used for local averages
  8. groupshared float3 averages[64];

Here nothing that complicated, you can just notice the groupshared declaration to store temporary results.

Now here is Compute Shader code.

Code Snippet
  1. [numthreads(64,1,1)]
  2. void CS_Average(uint3 dtid : SV_DispatchThreadID)
  3. {
  4.     //Compute 64 averages in parallel
  5.     float3 sum = 0;
  6.     for (uint i = 0; i  < 64; i++)
  7.     {
  8.         uint idx = dtid.x * 64 + i;
  9.         sum += PositionBuffer[idx];
  10.     }
  11.     
  12.     averages[dtid.x] = sum;
  13.     
  14.     /*We need to wait for all threads to execute,
  15.     so our groupshared is ready to use */
  16.     GroupMemoryBarrierWithGroupSync();
  17.     
  18.     //Just make sure only one thread finish the job
  19.     if (dtid.x > 0) { return ; }
  20.     
  21.     float3 endsum = 0;
  22.     for (uint j = 0; j  < 64; j++)
  23.     {
  24.         endsum += averages[j];
  25.     }
  26.     
  27.     RWAverageBuffer[0] = endsum * invcnt;
  28. }

Here we do the same dispatch as above, but threads write into this temporary buffer instead of on the output.

Then to apply final pass, we need to wait for all threads to have finished to process their writes, which is what GroupMemoryBarrierWithGroupSync does.

It will block all threads until all have finished (and since in our case they do pretty much the same job, the stalling should be fairly minimal).

Now we keep only one thread for the rest of the execution (other ones have finished their job), which performs the last small loop, but reading from groupshared instead.

That's it, instead we've done in in a single pass!

Performance wise, it's more or less equivalent (except it saves us a second dispatch on CPU). In that scenario it saves us on dispatch and to create one buffer, which is always handy also.

Please note that something like 64*64 is some pretty ideal scenario which might not reflect real life, so this example will potentially require a bit more gymnastics.

Performance tuning with groupshared is fairly complex, so I advise to test iterative/group versions on your scenarios, with a very large number of element some efficient iterative algorithm might win (also this will be very architecture dependent).

Of course, we can notice that compute shader version would also work perfectly for min/max like operations (which can be useful for some other purposes).

That's it for now )