Tuesday 22 October 2013

Transformation Matrices tricks

Anyone doing any type of coding has encountered transformations. They are the building block of any 3d application/game engine...

Now most of the time people will also not write their matrix code, it's already provided by any library, which ideally will provide you nice SIMD version for operations.

I assume you already know what is a Transform and what is a multiply.

So now a few operators of interest (eg: that you want to avoid to use), are Multiply (you will need it a lot but you want to save as many as you can) , and Invert (since it involves precision issue).

Generally you'll have spent a lot of time finding a reasonably fast Matrix multiply algorithm (which is SSE optimized), but then you can also simply spend time to just check how Matrix operator works and avoid using it :)

So let's take a few examples:

1/Translate and Scale

So let's say you want to move an object, then scale it.

You can create a Translation Matrix, create a Scaling Matrix, and multiply both of them.


 Now you can see there's not much point doing that, you can just set the Row for the translation and set the diagonal for the scaling. You saved one multiply just by doing this.

2/Scale then Translate

Now you obviously know that order or operation is important when dealing with operators, So if you scale before translate then you need a multiply.


So here we scale by S, then translate by T

We can do the same as before, eg:
Create Scaling Matrix , Create Translation Matrix and multiply them. Again lot of operators wasted.

You can simply set diagonal to S, and set last row (Translation) to S*T.
You just multiplied two vectors component wise instead of a full matrix multiplication.

Now, if you need to translate a Matrix but you don't know what the previous Matrix contains, you would say that you need to multiply. Yes and No ....

Translating a matrix will ONLY affect the last row, so instead of having the code :
Multiply Source * Translation Matrix, you can simply have a method that applies the matrix multiplication on the last row only (eg: you do 1/4th of the operation). First three rows will not be changed, no point of processing them.

3/Rotation


Now you have a nice rotation matrix around, but at some point you need to invert it (to process some billboards for example).

If your rotation is "pure rotation" (eg: no scaling component), this has an interesting property:
A*At = I (eg: matrix * transposed matrix) = identity.

This means that instead of inverting your matrix, you can simply transpose it for the same result, saving some multiplies).

4/Scaling

Another common operation is to scale a matrix (as per the Translate then Scale example).

So in this case you want to scale your matrix by sx,sy,sz

You can (as usual), create a scaling matrix and multiply all your lot, or simply
Multiply row 1 by sx
Multiply row 2 by sy
Multiply row 3 by sz

Et voila, 12 multiplies and you're sorted. (This can also be very easily vectorized).
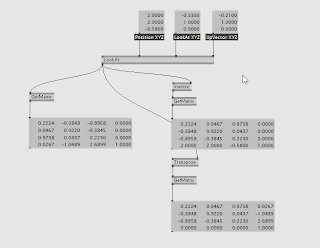
5/LookAt

Look at matrix is a bit of a special transform, of course widely used for cameras.

Simply put, from 3 components:
Eye : Eye Position
Target : Position where you look at (not direction)
Up Vector : This is often used for camera Roll. (in most cases it will be 0,1,0)

From those 3 vectors you construct a matrix that brings object into a space relative to the camera. 
There's no Scaling involved, so you mostly have a translation and a rotation.


Now most times you will compute your LookAt matrix and immediately Invert it (so you can use it for sprites, deferred rendering....)

Now let's think about the translation component.

I mentioned before that a LookAt transform brings your object into camera space, so to invert it, your translation component is ... your eye position :)

Now I also mentioned that there's a rotation component, which can be extracted into a 3x3 matrix , and you can simply transpose this matrix to have the invert rotation.

So technically you can build both LookAt and Invert in one go, saving again an Inversion.

Please note that for brevity I only bothered to show the transposed part in the Patch, but you get the concept.

That's it for now, but you have much more tricks like this when dealing with vectors.

As an exercise, for the reader build projection matrix and it's inverse in one go:

Ortho : http://msdn.microsoft.com/en-us/library/windows/desktop/bb205347(v=vs.85).aspx

Perspective : http://msdn.microsoft.com/en-us/library/bb205350(v=vs.85).aspx

Have fun !


Friday 11 October 2013

Parallel Reduction basics

Very often in computer graphics we need some form of parallel reduction.

For example, I stumbled on a vvvv blog post about boids simulation. In that case there is two main things you need for efficient simulation:

  • Average of all positions.
  • Acceleration structure for neighbours
Since actually both techniques use similar concepts, but the second one is slightly more advanced, I'll explain the first one.

So here is the deal:
We have let's say 4096 (64*64) boids, and we need average for some rules.

Our boids are stored in a StructuredBuffer (so we can Read/Write into it).

If we do this in CPU, we have something like this (pseudo code)

float3 sum;
foreach(boid in boids)
{
    sum += boid.pos;
}
sum /= (float)boidscount;

Of course, problem is our data is in GPU, so we don't want to transfer back and forth.

What is actually fun in DirectX11 is you have many ways to cover the same technique, let go trough a few of them.

1/Additive Render

Create a 1x1 texture (R32G32B32A32_Float)

Render all your boids, vertex shader is like this:

Code Snippet
  1. struct vsInput
  2. {
  3.     uint iv : SV_VertexID;
  4. };
  5.  
  6. struct psInput
  7. {
  8.     float4 screenpos : SV_POSITION;
  9.     float4 objectpos : TEXCOORD0;
  10. };
  11.  
  12. psInput VS(vsInput input)
  13. {
  14.     psInput output;
  15.     output.screenpos = float4(0,0,0,1);
  16.     output.objectpos = float4(PositionBuffer[input.iv],0.0f);
  17.     return output;
  18. }

Here we just set position to be 0,0 (since anyway we have single pixel), Boid position is sent to pixel shader as Texture Coordinate.

No here is our (hardcore) pixel shader:

Code Snippet
  1. float4 PS(psInput input): SV_Target
  2. {
  3.     return input.objectpos;
  4. }

We only return object position (please make sure to set Blend to Additive).

Now our single pixel contains the sum of all positions.

Divide this by boids count (in another pixel shader or a single compute shader), and you have your average position.

2/Good old MipMap

For this one, this is also pretty simple. Create a texture in R32G32B32A32_Float format as well, big enough to fit all boids (in our case 64*64 fits perfectly).

Now render your boids as PointList (so each boids position must arrive in a single output pixel).

So either draw 4096 elements, position boids from SV_VertexID to match a pixel (basic 1D->2D conversion). 

Alternatively you can make an instanced Draw Call (like 64 instances of 64 vertices each), So you will have SV_VertexID and SV_InstanceID as vertex shader input (each one representing row/column index)

Write boid position in the pixel as above (no additive this time, just a plain write).

Now just call GenerateMips on your texture, and your average position is in last mipmap.

So now since we use DirectX11 and have access to compute shaders, we might as well use them.

So here we are, compute shader way.

3/Dummy Loop 

Easiest technique to compute average is a simple dummy loop. 
You send a 1,1,1 dispatch, and here is the compute shader code:

Code Snippet
  1. [numthreads(1,1,1)]
  2. void CS_Average(uint3 dtid : SV_DispatchThreadID)
  3. {
  4.     float3 sum = 0;
  5.     uint cnt, s;
  6.     PositionBuffer.GetDimensions(cnt,s);
  7.     for (uint i = 0; i < cnt; i++)
  8.     {
  9.         sum += PositionBuffer[i];
  10.     }
  11.     
  12.     RWAverageBuffer[0] = sum * invcnt;
  13.     
  14. }

This (excluding simplicity), is an example on how NOT to use compute shaders.

You use a single thread which does all the job, so you have plenty of threads doing nothing and one doing big job, which is more like a serial algorithm.

But this will be useful at a later stage. Doing the whole calculation like that is a NO GO tho.

4/Iterative

Now let's improve that a bit. we want to use [numthreads(64,1,1)]

We have 4096 elements (eg: 64*64).

So what we'll do is the following:
Create a buffer with 64 elements.

Each of our threads will work on a part of the sum.

Code Snippet
  1. StructuredBuffer<float3> PositionBuffer;
  2.  
  3. RWStructuredBuffer<float3> RWAverageBuffer : BACKBUFFER;
  4.  
  5. [numthreads(64,1,1)]
  6. void CS_Average(uint3 dtid : SV_DispatchThreadID)
  7. {
  8.     float3 sum = 0;
  9.     for (uint i = 0; i  < 64; i++)
  10.     {
  11.         uint idx = i * 64 + dtid.x;
  12.         sum += PositionBuffer[idx];
  13.     }
  14.     
  15.     RWAverageBuffer[dtid.x] = sum;
  16. }
  17.  
  18. [numthreads(64,1,1)]
  19. void CS_AverageTransposed(uint3 dtid : SV_DispatchThreadID)
  20. {
  21.     float3 sum = 0;
  22.     for (uint i = 0; i  < 64; i++)
  23.     {
  24.         uint idx = dtid.x * 64 + i;
  25.         sum += PositionBuffer[idx];
  26.     }
  27.     
  28.     RWAverageBuffer[dtid.x] = sum;
  29. }

So now we have a 64 elements buffer containing a part of that sum. But we made efficient use of your threads (please note that I show two read patterns , "row or column" based).

Now what we can simply do it run our dummy loop above, but it will only run on 64 elements.

So by decomposing like this and adding an extra dispatch, we allowed the first part to run MUCH faster, and leaving a very little job to do for our unefficient shader, which gives a (very) significant gain.

Let's see another way

5/Using groupshared and Thread Sync

Now let's look if we can do this in Compute and a Single pass. Since our element count is not that high it should quite easily allow it.

We've seen that we store temporary sum into a structured buffer. Now compute shader have a small memory space where they can share data (it's big enough to fit our 64 elements).

So here are declarations:

Code Snippet
  1. float invcnt;
  2. StructuredBuffer<float3> PositionBuffer;
  3.  
  4.  
  5. RWStructuredBuffer<float3> RWAverageBuffer : BACKBUFFER;
  6.  
  7. //Used for local averages
  8. groupshared float3 averages[64];

Here nothing that complicated, you can just notice the groupshared declaration to store temporary results.

Now here is Compute Shader code.

Code Snippet
  1. [numthreads(64,1,1)]
  2. void CS_Average(uint3 dtid : SV_DispatchThreadID)
  3. {
  4.     //Compute 64 averages in parallel
  5.     float3 sum = 0;
  6.     for (uint i = 0; i  < 64; i++)
  7.     {
  8.         uint idx = dtid.x * 64 + i;
  9.         sum += PositionBuffer[idx];
  10.     }
  11.     
  12.     averages[dtid.x] = sum;
  13.     
  14.     /*We need to wait for all threads to execute,
  15.     so our groupshared is ready to use */
  16.     GroupMemoryBarrierWithGroupSync();
  17.     
  18.     //Just make sure only one thread finish the job
  19.     if (dtid.x > 0) { return ; }
  20.     
  21.     float3 endsum = 0;
  22.     for (uint j = 0; j  < 64; j++)
  23.     {
  24.         endsum += averages[j];
  25.     }
  26.     
  27.     RWAverageBuffer[0] = endsum * invcnt;
  28. }

Here we do the same dispatch as above, but threads write into this temporary buffer instead of on the output.

Then to apply final pass, we need to wait for all threads to have finished to process their writes, which is what GroupMemoryBarrierWithGroupSync does.

It will block all threads until all have finished (and since in our case they do pretty much the same job, the stalling should be fairly minimal).

Now we keep only one thread for the rest of the execution (other ones have finished their job), which performs the last small loop, but reading from groupshared instead.

That's it, instead we've done in in a single pass!

Performance wise, it's more or less equivalent (except it saves us a second dispatch on CPU). In that scenario it saves us on dispatch and to create one buffer, which is always handy also.

Please note that something like 64*64 is some pretty ideal scenario which might not reflect real life, so this example will potentially require a bit more gymnastics.

Performance tuning with groupshared is fairly complex, so I advise to test iterative/group versions on your scenarios, with a very large number of element some efficient iterative algorithm might win (also this will be very architecture dependent).

Of course, we can notice that compute shader version would also work perfectly for min/max like operations (which can be useful for some other purposes).

That's it for now )


Sunday 6 October 2013

cinder and windows RT/Phone, and lot of joy...

As some of you might know, I started to contribute to cinder.

There's a few reasons about it:

  • Having cinder app running as vvvv plugins can be pretty cool.
  • Let's spread a bit the dx11 world
  • I want to test if cinder is appropriate to become new FlareTic core (since i still look at moving some parts to c++)
So Microsoft people contributed some (decent) amount of code to have cinder running on WinRT. After some look there's quite a few bits which did tick me:
  • Code is more to replicate OpenGl fixed function. That's great, we are in 2013 and we use DirectX11 to emulate DirectX7/OpenGL1 (I'll stop commenting now on that, there's intention for quick portability but come on...)
  • No love for windows phone
  • I'm not commenting on code quality either.
So my idea is anyway to deal with decent scale graphics, if it means I need to replace most of the codebase so be it, at least by the look of it I have renderwindows and some events done for me, I can easily push my dx11 code ;)

So let's start, I run project as RT (since I already have window code for desktop there's no point using it as starting point).

Ok renderer code is a right mess with million (ok I exaggerate a tad) lines of random boilerplate code. I started to clean it with my resource wrapper, but then realized I would just waste my time (since I'm not gonna use that code anyway).

So let's go back the good old fashioned way, create two new wrappers for App/Renderer (basically copy the RT code), get rid of all the boilerplate dx stuff and push my render context instead.

Fix couple of initialization issues, and here we go, I got render working (instancing 65k boxes, my trademark hello world ;)

So technically by the look of it it wasn't that hard I thought (I just had to recompile and modify effects framework a little bit to fit it in, even if Microsoft decided to divorce Effects11 I still believe it's a great tool and it stays an integral part of my workflow for now).

Now since I also got a dx11.1 renderer, I decided to quickly check one new feature. Logical blend states.
That was easy, create a Xor Blend, apply to pipeline and look, all works out of the box (screenshot below looks a bit freaky and doesn't make justice to possibilities offered).


Now I wanted to test the other feature (UAV at every stage), which is for me the most exciting one, but since some big company called NVidia (not to name them) decided they would not implement it, I decided to leave it for later (I got an high end ATI but machine needs a big clean).

So let's go for another fun feature, try to build all that lot on windows phone.

So first thing is :
Build cinder for ARM : done, there's already target and lib files.
Build effects11 for ARM : quite simple as well, except there's of course no d3dcompiler shader/lib on folders. Copy files around a little tad solved it, really not the right way to do, but it's fine for quick testing ;)

All cinder compiled, let's try application now )

Build test application : Obvious 200 compile errors....
  • First microsoft decided to hide some #pragma lib deep into some imaging source files in cinder core, ok found them removed them.
  • Surface uses Wic a lot, not supported on windows phone. So basically any code making use of Surface class in cinder will create you linker error (and Surface class is used a lot).
  • Nevermind, comment all that lot (you love Git to repair your mess afterwards by the way ;)
  • Application Compiles
  • Run->Can't find d3dcompiler.dll ... That drives me nuts, I add it into project but it just doesn't want to deploy it... And I would LOVE to know why shader reflection was not allowed in the first place (if any Microsoft person reads this blog and has an answer, please let me know, I'll keep quiet about it promised).
  • Ok nervermind, since it's there out of the box in windows 8.1 (including phone), let's just try to see if my dx11 code + cinder runs (just a swapchain with solid color will do the job).
  • Comment any D3D compiler related parts, run, crash.
This random line to build cursor in WinRTApp is not supported on phone:

Code Snippet
  1. window->PointerCursor = ref new CoreCursor(CoreCursorType::Arrow, 0);

Run again, crash...

Now it's swapchain, to make things easy, options in WindowsRT and Windows Phone have to of course be different, so here is Windows phone SwapChain creation:

Code Snippet
  1. DXGI_SWAP_CHAIN_DESC1 desc;
  2. ZeroMemory(&desc,sizeof(DXGI_SWAP_CHAIN_DESC1));
  3. desc.BufferCount =1;// 2;
  4. desc.Format = DXGI_FORMAT_R8G8B8A8_UNORM;
  5. desc.SampleDesc.Count = 1;
  6. desc.SampleDesc.Quality = 0;
  7. desc.BufferUsage = DXGI_USAGE_RENDER_TARGET_OUTPUT | DXGI_USAGE_SHADER_INPUT;
  8. desc.Scaling = DXGI_SCALING_STRETCH;
  9. desc.SwapEffect =DXGI_SWAP_EFFECT_DISCARD;// DXGI_SWAP_EFFECT_FLIP_SEQUENTIAL; // All Windows Store apps must use this SwapEffect.
  10. desc.Flags = DXGI_SWAP_CHAIN_FLAG_ALLOW_MODE_SWITCH;
  11. desc.Width = width;
  12. desc.Height = height;

Please note I love previous comment saying all windows store apps... Well doesn't apply to phone obviously...

Ok run again, hurray I got swapchain rendering on my phone.

Now try to switch back from my renderer to contributed one (error dataflow... ;) , please, we want Direct2d/DirectWrite/Wic also for phone ;)

Conclusion:
-Having cinder running as plugin will be piece of cake, for windows apps it's also pretty simple.
-Getting standalone Desktop/RT (pro) path is also quite trivial
-For anything like phone, seems gonna be a pain without scrapping a lot of code and cleaning it up.
-As a use for my tool, no decision yet.
-c++ is fun ;)
-Let's have a decent try on windows phone 8.1 (which already removes d3dcompiler issue, the biggest caveat for me).


Wednesday 2 October 2013

Graph API in FlareTic

Before a (long) post explaining new feature set which is going into FlareTic (and that is hefty believe me), I thought I would speak about the internals of it a little bit.

So let's start with graph evaluation.

Most node based software follow a single paradigm:
-Data driven (vvvv)
-Event driven (max)
-Bit of mix in between (vuo)

That means all your composition has to fit that model, which for me was always feeling non natural and unefficient.

So in contrast, FlareTic provides different patch types, each of those can have whatever paradigm they want.
Also node set is dependent on patch type, so some nodes are only allowed in some patch and not in others.

That gives some advantages/drawbacks, let's start by drawbacks:
  • It can be a little bit confusing since when you create a new patch type you have to learn about how it works.
  • Since each node set is on a per patch basis, you have a potential of high node duplication.
Now it gives some advantages:
  • Since each patch type is isolated with some node set, it's very easy to optimize each type.
  • I can create some patch types that do different things (State machine for example)
  • To minimize node duplication, there is a connector system which allows transfer between patches based on some rules.
  • Having a limited node set per patch allows to keep those patch clean (no mix up between logic/rendering for example).
  • I could create a patch type which does everything if I want to ;)
So here is what we have for the moment:
  • Root patch: Mix of Event/Data driven (event for devices, data for textures)
  • Automation patch : Data driven, since in that case it's the easiest model.
  • SceneGraph : No real model, everything is dealt on connections, and nodes define their own rules. So links are purely interface based, and a node will decide if it wants it or not. This gives a lot of work to nodes, but allows to have extremely simple pipeline (for example, particle system node can accept any emitter/collider/behavior, organizes all that lot internally, so we don't need any fancy grouping on patching side). It also ensures code quality, if a new behavior is created it will fit in the system directly.
  • State Machine patch : No model either, since it rebuilds state machine when you add states/create links... after the state machine is passed around but there's no more graph evaluation
  • Shader patch : Same as above, patch actions notify the patch to rebuild shader, then shader is passed as single object.
One big advantage over it is I can create a new patch type (in progress, there's an OpenCV patch, which runs in background and auto sync), define it's rules and I get some new optimized version for it. Not allowing to mess every node together also ensures some code quality, but more on this in next post too, there's few other parts in progress ;) 

Now also since I decided to follow the rule "less nodes/more workload", it fits pretty well in the pipeline, since I hardly need to optimize evaluation, Node set ensures I have quality components. New nodes need to fit into the pipeline, so it doesn't get polluted by lot of random nodes.

On evaluation, there's also no real fanciness, no parallel graph evaluation, no real hardcore graph branch elimination (that's only dealt by pin who tells if they want data or not), and if a patch does not run it does not run, which is just the easiest thing ever, but so efficient in 99% cases ;)

So why no parallel evaluation? Well I don't adhere to the fact that parallel is faster (not always at least, and can also be much slower). I think it's just some marketing crap for people who have no clue about programming internals.

So let's explain a bit.

Let's take a simple example (the one presented in one of those random vuo demo).

You have this graph


So as we can see A provides data to B and C, which are have no linear dependency, then both of those provide data to D, which need to create a barrier (eg : make sure B and C have evaluated) before to execute.

So we could easily say "OH, if we run B and C in separate threads we'd have a speed gain, let's do that!!"

NO!!!!

Let's explain : Thread synchronization has a cost, and here we have 4 operations which so minimal (one Add, one

Multiply , one Divide, plus little bit of graph parsing) that you'd have processed all that data serially before to dispatch threads/barrier.

Now let's say C has a huge workload (I added a large set of random values to the second pin as per the picture):


Now in that case running B and C in parallel would give no or very little gain, since you'll have one node (B) doing more or less no work, and one node (C) which will be pretty busy.

In that case a real gain would be to have C to spawn multiple threads, since a multiply is easy to make parallel (4 threads processing 100000/4 elements each). Running B and C concurrently is totally useless.

Only good use case for such a scheme would be:


In that case we have B which also has a decent workload, so running both concurrently would give some performance improvement. But....

Now let's look a bit closer again:
B still has much less workload than C, so D will have to wait for C again.
If now we push 10 times more data to C, D will still wait for C.

So bottleneck stays C.

Since both operators are easy to parallelize, running data parallel on B and C would still give a much higher performance boost.

Now we can also say? Why not Using both techniques? (eg: run task parallel and data parallel)

Well you'll run into issues, it can be done, but it's pretty complex. Now you'll have B and C fighting for processing time, so it's not as easy as it looks.

Now just to add a little bit, let's add 2 more nodes E and F.


Now what path is your scheduler gonna choose?
3 threads for B,C,E, barrier on D, barrier on F
2 threads, B,C,D in serial, E on it's own, barrier on F?

Since each node can also have different workload (which can also vary over time), well combinatorial explosion on the way.

And here I got only 6 nodes (I don't count the iobox ;) think of a composition with 1000 nodes (which is a small composition in general if you have low level node set).

Also add the fact that composition needs to submit data to gpu for rendering (Since we don't want to do hello world all the time ;) , GPU having parallel command list on it's own, You also have (like in my last project) several threads for network sync,camera/video decoding, texture streaming. In that case adding more cores into your graph might also pollute those and make you whole application run slower.

I'm not even mentioning that if you need to render the data above, you can replace that patch with a compute shader and blow away performance anyway (by a pretty huge factor).

So basically, multicore graph processing is hard, don't advertise it unless you can show some proper rock features, not an hello world with 4 nodes which doesn't even benefit from it ;)

Best solution (but not "designer friendly", is to give use the choice, to let them decide where they know some parts of their compositions are intensive and select that manually).

So here we are, next time I'll go a bit deeper into the Scene Graph, shader system (before the big fat post)

Stay tuned ;)